Colorful language flows from the fingertips, as it does from the lips of this spouse-made farm girl, but in this crazy life we all need some colorful discussion to distract us from our own, everyday craziness! In here, we do DIY, farm life, and a lot more!
This page contains affiliate links. If you choose to purchase after clicking a link, I may receive a commission at no extra cost to you. Additionally, as an Amazon Associate, I earn from qualifying purchases. Images are often links directing readers to where they can purchase the item pictured or a similar item. Items endorsed in our posts are items we use or have used, and recommend to others.
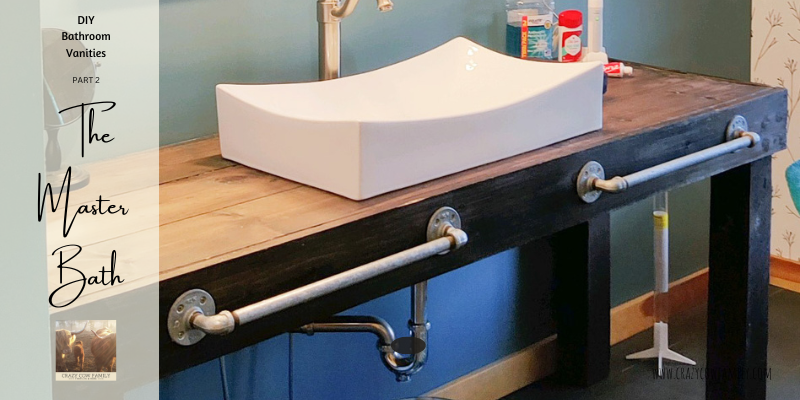
The Master Bath
Part 2 in my DIY bathroom vanity post series.
Type-A…Positive
It’s been nearly 2 weeks since my Guest Bath reveal, and I’ve been crazy busy with some other projects…sorry for neglecting to complete Part 2 of this post series, but here it is now: The Master of All Baths! Be warned, this one’s a doozy. The ease of my guest bath, simply cutting a few holes in an in-tact piece of furniture, made it a great starter project. The master bath vanity was not quite the same level of ease, though I’m pretty sure it took longer for me to build the vanity than it’s taken me to write this post – my type-A nature is why the letters on my delete button are rubbed clean off, and also why I’m a badass with a miter saw. I like to think that this part of my personality is a positive feature…I plan and re-plan until the plan is perfect, execute the plan slowly and meticulously, and take pride in the final product. All of this took place in the making of this bathroom vanity, and it could not have happened any other way. The guest bath was just the warm-up to this total-body, DIY workout!
In perfect type-A form, I spent hours and hours, over days and weeks, searching the web (Pinterest, mainly) for the inspiration I needed to devise a plan. As I mentioned in “About Me,” our family faced some tragedy in 2010, resulting in my husband losing the lower part of his right leg…this meant we needed a vanity that could accommodate a wheelchair. Yep, I used the word “accommodate.” Seriously, this term was the focal point for every aspect of our newly built home, from rough draft to final blueprints, to decor and finishing touches. Making sure my husband would have his present and future needs accommodated, was of the utmost importance! There is no place in one’s home where the need for personal accommodations is necessary more than in the bathroom. Fact! We obsessed about it, and every photo of a vanity that I saved online or cut out of a magazine, boasted an open concept…a stool could be stored underneath or it could be comfortably sat at in a wheelchair. My final, ah-ha moment came from a pin of a farmhouse table; 4×4 wood legs with a simple wooden top (I built one for my dining area – don’t worry, it’ll be revealed in a future post!). I was inspired. Let the design process commence!
The Dog Ate My Homework
I had a plan. For real, not lying, there was an actual piece of paper with a sketch of what I had in mind to build. Well, a few years and a few projects later, the location of that original document is a mystery. This happened a lot before I decided (from the encouragement of friends and family) to share my plans and designs, but I invested $5 in a little leather (not really, but it’s red and pretty and feels like leather) journal where I keep all my ideas. I highly recommend this method…I’ve actually found ideas drawn in this little book that I had forgotten I had! Getting back to the project at hand, I decided to recreate the plan on my iPad with a really cool app, Sketchbook.
Get Your Build On
All the steps for building the table that holds the sink are here. That was, once again, the easy part. Finding the sink took some effort. Did I say “sink?” Silly me, “sinks” was actually what my first thought was. I planned to have his and her’s spaces in my new master bath – one for shiny cleanliness (her’s) and one for beard trimmings and toothpaste clumps (his). Well, it didn’t take long for me to remember that I am really not fond of cleaning; one sink would really simplify my life, and were we really ever brushing our teeth at the same exact time anyway? Nope. One large, rectangular sink is what I found, along with a pretty faucet that looks like an old water pump. Amazon has both of these items at really reasonable prices. So, now that all the elements for completion of this vanity are awaiting their final destination, it’s time to build it!
Materials & Tools
Not gonna lie, I’m a Home Depot fan! I get most of my lumber, tools, and other supplies there. If there’s a link below that doesn’t specify where it takes you, you’re going to Home Depot! I bought the lumber at HD for less than $0, all the other supplies I had on hand. All in all, this is a pretty inexpensive way to own a custom vanity!
The final dimensions of my vanity are:

Shopping List:
- 4″ x 4″ x 8‘ Beams x 2 (I used the 4 x 4s that were part of a pallet of lumber while we built our house)
- 1″ x 6″ x 6′ Boards x 3
- 1″ x 8″ x 6′ Boards x 3
- 2″ x 4″ x 8′ Board x 1
- Screw Gun (this is the set I use now, pay no attention to the old yellow one pictured)
- Star-Head Bit (my bucket of screws came with the bit)
- Bucket of Screws (these are my favorite)
- Palm Sander & Paper (for smoothing the cut edges and sanding wood filler)
- Rag (for staining)
- Stain (I used this for my vanity)
- Stainable Wood Filler
- Liquid Nails
- Miter Saw (this is mine)
- Hole Saw (the same one used in Not Just a Guest Bath)
- Top-Mount Sink – Buy mine here!

Cut List:
- 2 – 1″x 6″ x 72″ (front and back apron)
- 2 – 1″ x 6″ x 21.75″ (side aprons)
- 4 – 4″ x 4″ x 31.25″ (legs)
- 3 – 1″ x 8″ x 70.5″ (top surface)
- 2 – 2″ x 4″ x 21.75″ (reinforcement for under sink)
Method
1. Sand and stain everything. I sanded everything before putting the boards together, but I waited until it was all built to stain it. If I did it again, I’d stain all the boards first, and touch up over the wood filler after. I wanted a rustic, old look, so I was happy to have the gaps from shrinkage between the boards that make the top surface. I was not, however, all too thrilled with my gaps showing the natural color of the wood over time, after the boards shrunk a bit…this is why I can’t stress enough: stain all the edges and sides before you build!

2. Place 2″ x 4″ reinforcements on 1″x8″ top surface. With the 3 top surface boards face down, tight together, and evenly aligned on the ends, use Liquid Nails to secure 2″ x 4″ boards. Mine were secured at 10″ from the center on each side to help hold the weight of the sink. When this is dry and holding strong, flip the top and use screws to secure the 2″ x 4″s to the top (these screws were hidden under my sink, but your’s could be hidden with wood filler). Flip back over so the top is face down again.
3. Secure aprons to top surface. Using screws, attach the 1″ x 6″ front and back apron boards to the front and back of the top surface. Repeat this step with the side aprons.
4. Place 4″ x 4″ legs in corners. I used 4 screws on each of the apron sides to secure the legs to the top. Get a friend to help flip the vanity onto its legs.
5. Prepare the drain and waterline holes. Mark the spot where the drain and waterline holes need to be drilled, and cut them with the hole saw.
6. Finish all the rough edges. Use wood filler to fill all the screw holes, and sand when dry. Touch up filled spots with stain.
7. Mount the sink and connect waterlines. This step happened in the same manner as in The Guest Bath.

That’s a Wrap

Well, there you have it…a custom, rustic vanity that you built yourself. To wrap up this project and personalize it to my taste, I went back to my favorite hardware store and purchased the stuff I’d need to make my own towel rods: 2 pieces of 1/2″ x 18″ galvanized steel pipe, 4 elbows, and 4 of these to hold it all to the wood apron. This part wasn’t cheap, but it was the look I was going for, so I sucked it up. My plumber even thought it would look better to have shiny metal pipes under the sink, since they are visible to anyone who uses my bathroom…he wasn’t wrong. I couldn’t be happier with how it all came together (except for the part about me forgetting to stain first)!
Thanks for reading! Remember to follow us on Facebook, Pinterest and Instagram, and share your projects with us!